Markerless motion capture for cycling
Bike fit angles on the trainer, from one video
Film a rider pedalling on an indoor bike or smart trainer from the side, and read the knee, hip and ankle angles through every pedal stroke — the knee at the bottom of the stroke, the hip at the top, the trunk's angle on the bars. Measured while they ride, not sitting still with a goniometer.
Plans from $29/month · Cancel any time
Indoor bike · side-on
one real clip →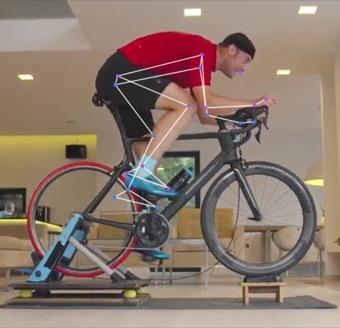
Top
0:06.6
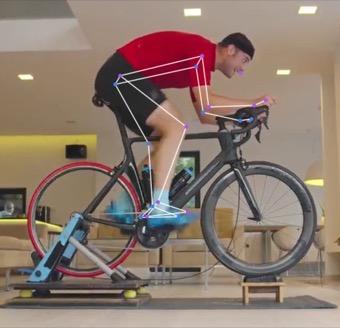
3 o'clock
0:06.7
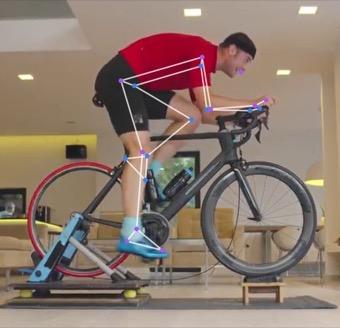
Bottom
0:06.3
Through the pedal stroke
| Knee at bottom | ±2.2° over 33 strokes | 158.4° |
| Knee at top | most bent | 74.6° |
| Hip at top | most closed | 36.8° |
| Cadence | from the video | 104 rpm |
Tagged
0:06.3Bottom of the stroke — knee 158° on average, above the 145–155° starting range
…plus knee, heel and toe paths, every frame, as JSON or CSV.
1
phone, filming side-on
Every
pedal stroke measured
14
joint angles per frame
0
markers to stick on
Fit, measured while they ride
Dynamic, not static
A rider sitting still with the crank at six o'clock isn't how they ride. Measuring while they pedal captures the angles they actually reach, at their own cadence and effort.
A trainer is the ideal set-up
The bike doesn't move, so one camera on a tripod sees the same view for every stroke — exactly the conditions a single-camera measurement needs.
Before and after, in one place
Change the saddle height, film again, and put the two side by side. The effect of the change becomes numbers, not just how it felt.
What it measures on the bike
Pedalling repeats more than once a second, so a short clip holds dozens of strokes to measure.
The knee at the bottom of the stroke
The bottom-of-the-stroke figure fitters set saddle height from, read off every revolution: the average, the spread from stroke to stroke, and a chart of each one — click a stroke to watch it.
Range of motion→Hip and trunk at the top
How closed the hip gets as the pedal comes over the top, and the trunk's angle on the bars — the numbers behind reach, drop and comfort.
Angle charts→The ankle through the stroke
The ankle angle on every frame shows how much the rider drops the heel or points the toe. It's calculated from the landmarks, and labelled as such in every download.
Data export→Fit changes, side by side
ProFilm before and after a change to the saddle, cleats or bars, and compare the two clips joint by joint on the same moment of the stroke.
Side-by-side comparison→Every rider's history
File each fit under the rider and keep the record — what changed, when, and what the angles did.
People and progress→Send the rider their fit
A view-only link to their video with the skeleton drawn on and the angles beside it. They don't need an account to open it.
Shareable links→
From the trainer to a fit report
- 01
Film side-on
Phone on a tripod at hip height, level with the bottom bracket and square to the bike, with the rider and the whole bike in frame. Shorts or fitted kit make the knee and ankle easy to track.
- 02
Ride steady
Let the rider settle at their usual cadence and effort for a minute. Fifteen to thirty seconds of steady pedalling is plenty to measure.
- 03
Read it as cycling
Pick the cycling view and every pedal stroke is found for you — knee at the bottom and top, hip at the top, ankle range and cadence, per revolution. Trim to the steady part and it follows.
- 04
Compare and share
Change the fit, film again, compare the two, and send the rider a link to their result.
Every pedal stroke, in a spreadsheet
One row per frame, one column per joint. At 90 rpm the cranks turn 1.5 times a second, so filming at 30 fps catches each revolution in about 20 frames, and 60 fps halves the gap. Find each bottom of the stroke as the knee's local maximum, then average them.
Everything in the exports→Open a real report like this→# Steady 90 rpm: 0:20.0–0:50.0 of Fit check · side-on
# calculated from the landmarks, not measured by the engine: left_ankle
frame,time_s,left_hip,left_knee,left_ankle
600,20.000,99.1,145.8,104.2
601,20.033,100.0,147.0,103.1
602,20.067,99.6,146.5,102.7
603,20.100,97.4,142.9,103.4
604,20.133,93.8,136.7,105.0Is it the right tool?
Worth knowing before you sign up, not after.
A good fit when
- The rider is on an indoor bike, smart trainer or rollers that keep the bike in place
- You're setting or checking a fit and want the angles while they pedal
- You want before-and-after evidence for a change to the bike
- You film the same way each time, so sessions compare like with like
Look elsewhere when
- You need knee tracking as a frontal-plane angle — side-on video measures the angles in the plane of pedalling
- You need power, pedal force or left/right balance — those come from a power meter or smart trainer
- The rider is out on the road with the camera following, so the view isn't square to the bike
- You need lab-grade 3D measurement without validating it yourself
Range of motion, tags, people and shareable links are on every plan, from $29/month. Comparing two fits side by side and smoothing filters come with Pro ($59/month). Working alongside other coaches? Advanced includes 5 seats.
Compare plans→The features behind it
Range of motion
Fourteen joint angles, measured on every frame
Read more →Side-by-side comparison
ProTwo measurements, lined up on the same moment
Read more →People & progress
Everyone you measure, session by session
Read more →Shareable links
Send a report or an exercise to anyone — no account needed
Read more →Take the data with you
JSON and CSV for everything, with the provenance attached
Read more →Tags, comments and clips
Pin what you noticed to the frame where you noticed it
Read more →
Also see: Markerless motion capture for indoor rowing · How markerless motion capture works · Markerless for biomechanists
Questions, answered
Can you do a bike fit from a video?
You can measure the angles a fit is built on — knee, hip, ankle, trunk and elbow — from a side-on video of the rider pedalling on a trainer. What to change is still the fitter's judgement: comfort, flexibility, injury history and goals matter as much as any number.
What knee angle should I see at the bottom of the pedal stroke?
Many fitters work from a starting range of roughly 25–35° of knee bend at the bottom of the stroke — 145–155° in Markerless's convention, where 180° is a straight leg — and adjust from there. It's a starting point rather than a target we set, and a camera's angle isn't quite the same measurement as a goniometer on the bony landmarks, so compare against your own earlier measurements made the same way.
Where should the camera go?
Side-on and square to the bike, at about hip height and level with the bottom bracket, with the whole rider and bike in frame. Film the side you want to measure — the far leg is hidden behind the bike for much of the stroke.
What frame rate do I need?
At 90 rpm the cranks turn 1.5 times a second — 540° every second. At 30 fps that's a frame every 18° of crank rotation; at 60 fps, every 9°. The knee angle changes slowly near the bottom of the stroke, so 30 fps is usually enough; 60 fps is worth it at high cadence or for reading the ankle.
Can it measure knee tracking?
Not as an angle. The joint angles are measured side-on, in the plane of pedalling. Film the rider from the front instead and the exported keypoints trace the knee's path from side to side over the pedal — useful to look at, but not a single number we report.
Does it work on a smart bike or rollers?
Yes — anything that keeps the bike in one place relative to the camera. A smart bike or a trainer is ideal; on rollers the bike moves a little, so keep the camera far enough back that the rider stays in frame.
How accurate is it?
We haven't published a validation study against marker-based motion capture, so treat the angles as a consistent measure of what the camera saw rather than a lab-grade absolute. That makes them strongest for comparing an athlete with their own earlier sessions, filmed the same way — which is most of what coaching and fitting need.